Enter Purchase Order Line Items
Vendors must be defined before accessing this form. Only items assigned to the designated Vendor may be added to the purchase order.
After creating the purchase order, add items using one or all of the following methods:
When finished adding items, click  Save on the main form toolbar.
Please see remove a line itemif applicable.
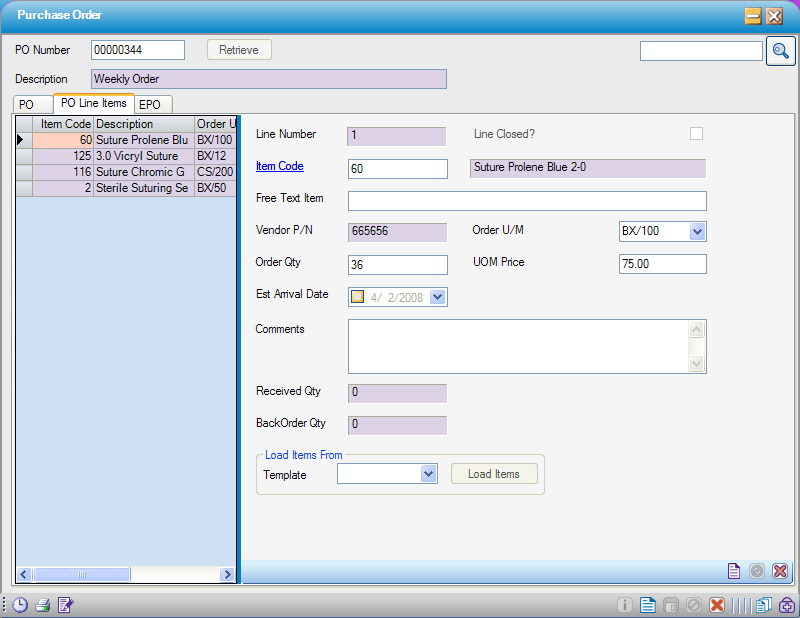
Item-Specific Fields
Depending on the center’s configuration some item-specific fields may be pre-loaded. The list below shows which fields may be edited and which will print on the Purchase Orders.
|
Field Name |
Note |
Editable here? |
Prints on P.O.? |
|
Vendor P/N |
Pulled from Vendor Tab of Item Master |
|
|
|
Order U/M |
Pulled from Vendor tab of Item Master |
|
|
|
Order QTY |
Pulled from Vendor tab of Item Master |
|
|
|
UOM Price |
Pulled from Vendor tab of Item Master |
|
|
|
Estimated Arrival Date |
Can be set specific for this item |
|
|
|
Notes |
Specific for this item |
|
|
|
Received QTY |
System generated after receiving |
|
|
|
Back Order QTY |
Entered on Receiving screen |
|
|

Add items from template
1. Choose Template from drop down list
2. Click  . Items from the template will be loaded and listed in the grid view on the left hand side of the screen.
3. Edit or delete individual items once loaded.
Load items one by one
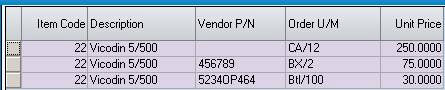
When adding an item it will pull the highest priority vendor (1 being highest, 10 being lowest). For a different UOM/Price or Vendor P/N, use the Look Up. The Look Up will display all Item Vendors associated with the code (shown below).
1. Click  New Item
2a. Type in the Item Code and press <enter> on the keyboard
-- OR --
2b. Click the Item Code text to look up the item
3. Edit or delete individual items once loaded.
To add an item to the physical count without creating a Purchase Order for it, add the item via Free Text. Then receive the item, but note, it is not posted to inventory.
1. Click New Item
2. Type in the item’s description in the Free Text Item field
3. Edit or delete individual items once loaded.
Remove line item
1. Double-click the line item in the grid view on the left side of the form
2. Click Delete item on the sub-form toolbar
3. Click Save on the main form toolbar